As a series of articles, I have been afraid to share this part. From the past to the present, it took more than ten days to explore, install, and debug the HTPC, and finally succeeded in building it successfully, realizing the initial vision.
First, the demandTechnology is for me. I want to build a HTPC, the main function is to achieve a home entertainment hub, can be a player, to achieve high-definition audio and video playback, taking into account the data download, storage and sharing capabilities, HTPC stored audio and video data can be retrieved by mobile phone pad .
However, when communicating with friends, they were mocked. . . It is less than 200 yuan to download treasure. . .
Does HTPC still have any significance? This guy has a very reasonable saying, "I'm T0, I'm playing mc at most, unless you play bwl with blue equipment... But you can't solve it with 200 bucks." I'm the one who pursues bwl. .
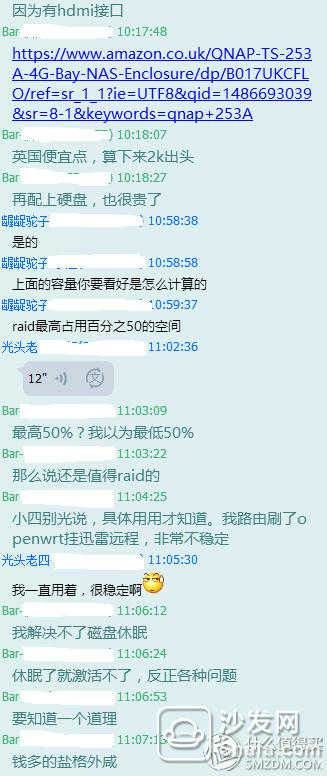
Second, the hardware configurationMany people discuss how an HTPC should be configured. Involving a variety of indicators, in fact, I must have hdmi. This choice is very broad. The first step is to choose the motherboard. I selected the Gigabyte/Gigabyte b85m-d3h, matx size, so I chose the dell 390DT chassis, thick skin, can be placed horizontally, enough capacity to place the optical drive and a 3.5 and a 2.5 hard drive . Cup is G1840, boxed only 230 yuan. The hard disk is the Western Digital red disk 3T. It is said that the red disk is designed for NAS and is suitable for long-term use. The memory is a single 4G ddr3. enough. A total of more than 1400 down.
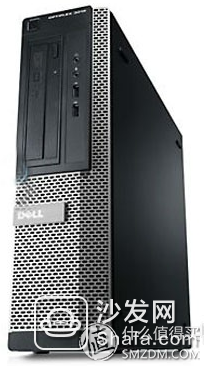
The chassis is slightly larger and placed just beside the TV cabinet. To say it is really heavy. All of the above are purchased on Taobao.
Although liberal arts originated, it was no stranger to the assembly of computer hardware.
What system to install really makes me indecisive. At the beginning of the game, Blackgroup Hui was deployed, mainly NAS, and media player with Docker was implemented. Successfully installed and smoothly washed white, but do not like this system exception, although there are a variety of app support, ease of use and practicality are high, but do not want to engage in virtual machines, undetermined PT download, can not meet my needs. Did not do much research on hastily deleted. In fact, there is a chance to delve further and it should be better than my current system, mainly because there are a large number of ready-made apps to meet the mobile needs. The sharing of wolf story friends has been quite detailed.
 Less than 500 yuan idle computer, replace the 55 yuan chassis - set up home black group Hui NAS First, foreword: Hello, everyone, you have come again. This original was very early in the concept of how to write, because it is indeed a digital enthusiast, when it was learned that there is a group of Hui Wei Unicom NAS's existence, can not help but want to experience the experience. However, the lack of funds for their own, think about it, hard drives, and the price of Synology NAS. There is no possibility of a 5K ah. Everyone can refer to the lowest price: Synology DS26PlayNAS: Synology (S Wolf Story | Likes 945 Comments 391 Favorites 4k View Details
 And then for the commonly used win10 system, spent three days, not satisfied, mainly my hardware configuration is not high, running win10 plus kodi have Caton sense, do not like. Fight to Ubuntu, this site coolll shared a series of articles as early as 14 years, inspired me more.
 With a xbmcbuntu system to get a computer HTPC + NAS Chapter 1: Basics In fact, when I set up a home theater and group HTPC when I want to write a few singles, but because of bad writing style and has been done before the corresponding sun single It is mainly because of laziness that it is finally gone. This time, I originally created the xbmcbuntu+nas two-in-one system (in fact, there are articles for each corresponding function on the Internet, I have done integration), and no one had previous experience, so this time I want to escape from the self again. Not to Zhang Da Ma coolll | Likes 471 Comments 183 Favourites 2k View Details
 Not much to say, start the architecture.
1. Install Ubuntu server system First download the installation package on the official website: https://
U disk tools to make a boot disk
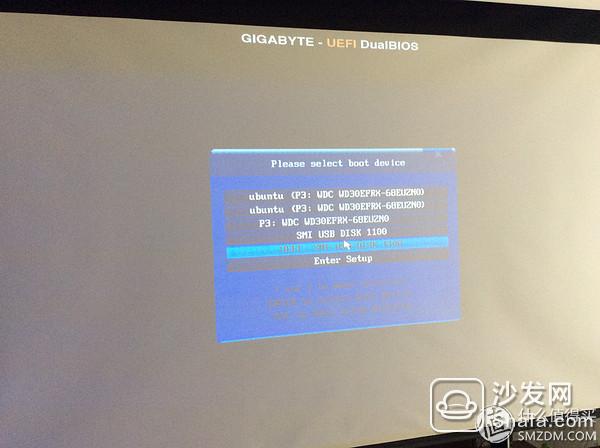
Boot startup item, select UEFI installation (large disk support)
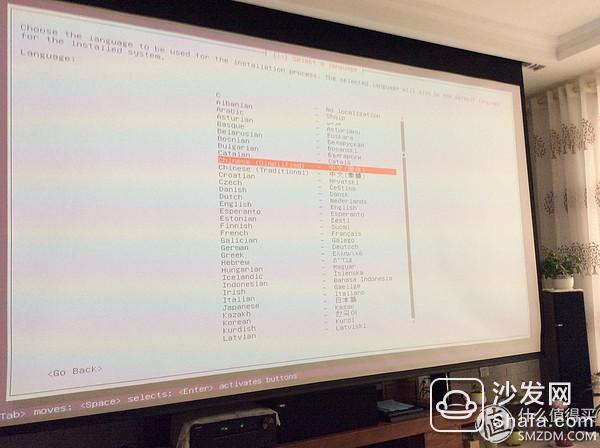
Follow the installation prompts and select
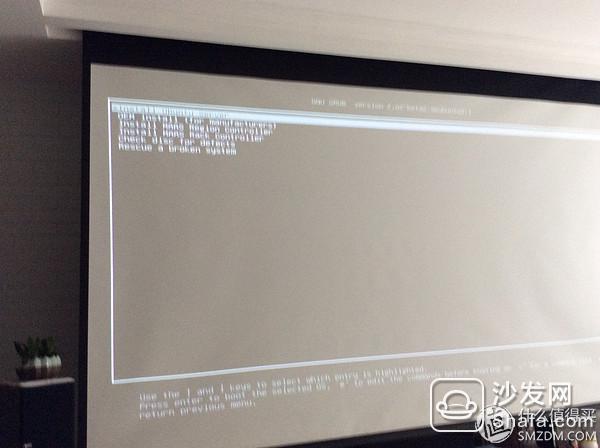
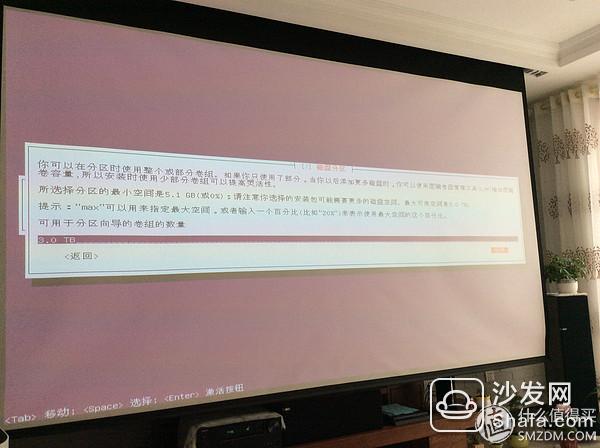
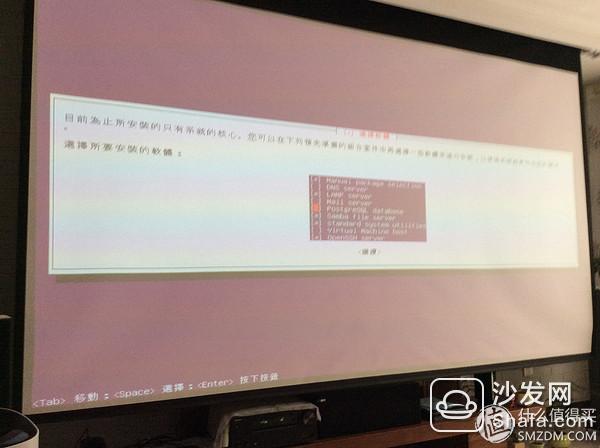
The entire installation process is very detailed and no difficulty. When configuring the hard disk, you need to pay attention. If you need soft raid settings here, I don't think raid is more important than using raid.

Because it is a server version, many server tools are integrated. I chose here to use the next samba, ssh, LAMP and other services.
Install the boot, you will find no desktop, slightly inappropriate, just use the command character to install it. First to query ip, use the command
Ifconfig
Easy to use putty for ssh login. Download ptty, type configuration information, login.
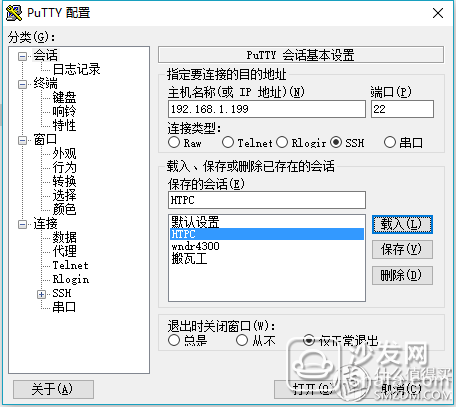
Then you can sit in front of the desktop configuration.
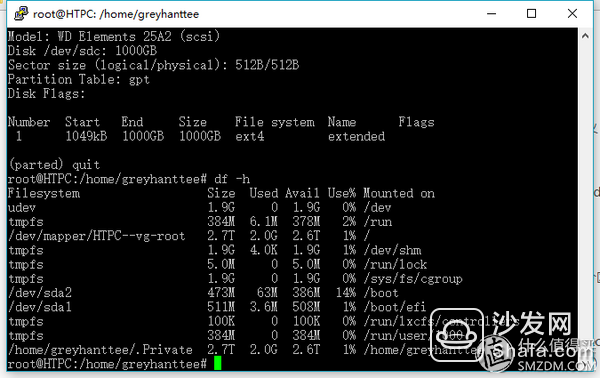
3. Mount the usb hard disk.Although the host has 3T, but mobile hard disk should also be used. Use the command as follows:
Sudo parted /dev/sdb # new hard disk /dev/sdb, greater than 2G can not use fdisk
Print #Check it out
Quit #exit parted
Sudo mkdir /data1 #create folder
Sudo mount /dev/sdb1 /data1 # Mount on /data1
Set the hard disk to be automatically mounted to avoid the hard disk from being mounted after the restart
Sudo chmod -R 777 /etc/fstab #open access
Vim /etc/fstab #Add in /etc/fstab
/dev/sdb1 /data1 ntfs defaults 0 0
In fact, installing the desktop only selects the output source when configuring kodi, because no code operation is required, so you must install the desktop. This seems to lose the significance of the server version. . .
Sudo apt-get update #update
Sudo apt-get upgrade
Sudo apt-get install ubuntu-desktop #install desktop
5. Install kodi The kodi wiki is covered in detail: http://kodi.wiki/view/HOW-TO:Install_Kodi_for_Linux
Sudo apt-get install software-properties-common #support package
Sudo add-apt-repository ppa:team-xbmc/ppa #update ppa source
Sudo apt-get update
Sudo apt-get install kodi
#sudo apt-get install kodi-pvr-mythtv # pvr package
6. Install the transmission-daemonTo download with pt, this is a must. The reason for installing daemon is to refuse to use desktop operations. Ubuntu official website details: https://help.ubuntu.com/community/TransmissionHowTo#Transmission_Daemon
Sudo add-apt-repository ppa:transmissionbt/ppa
Sudo apt-get update
Sudo apt-get install transmission-cli transmission-common transmission-daemon
Configuration:
Sudo service transmission-daemon stop #Make sure not to run
# Open permissions
Sudo mkdir /data # create a variety of folders
Sudo mkdir /data/Movie
Sudo mkdir /data/Music
Sudo mkdir /data/Adult # Big Sister's Room
Sudo mkdir /data/Vedio
Sudo mkdir /data/Download
Sudo usermod -a -G debian-transmission greyhanttee # Create user name, Ubuntu has various user protocols, which are often used
Sudo chgrp -R debian-transmission /data
Sudo chmod -R 770 /data
Sudo nano /var/lib/transmission-daemon/info/settings.json #Edit configuration file
{
"download-dir": "/data", #Set to the root directory of the file you just created. Subdirectories can be entered in the web.
"rpc-password": "password", #Change to Your Own
"rpc-username": "username", #Change to Your Own
"rpc-whitelist": "127.0.0.1,192.168.*.*", # or "*" (any URL access?)
"umask": 2,
# There are many items that can be modified, and have not been studied ##
}
Sudo service transmission-daemon start #Start
7. Install aria2 # Use web controlSudo add-apt-repository ppa: t-tujikawa/ppa # Is there a better version?
Sudo apt-get update
Sudo apt-get install aria2 #Ubuntu is so convenient, just one command, you can install the software
Configuration:
Sudo mkdir /etc/aria2 #New Folder
Sudo touch /etc/aria2/aria2.session #New session file
Sudo chmod 777 /etc/aria2/aria2.session #Set aria2.session writable
Sudo vi /etc/aria2/aria2.conf #Create a configuration file and enter:
#========= Save the file directory to modify
Dir=/data/Download #Download directory
Disable-ipv6=true # Open rpc for web management
Enable-rpc=true
Rpc-allow-origin-all=true
Rpc-listen-all=true
#rpc-listen-port=6800
Continue=true
Input-file=/etc/aria2/aria2.session
Save-session=/etc/aria2/aria2.session
Max-concurrent-downloads=5
Start the test
Sudo aria2c --conf-path=/etc/aria2/aria2.conf #test, if there is no error, ctrl+c can be stopped
Sudo aria2c --conf-path=/etc/aria2/aria2.conf -D #starts and runs in the background
Set up boot
Sudo chmod 777 /etc/rc.local
Sudo vim /etc/rc.local # "/etc/rc.loca" is added at the end:
Sudo aria2c --conf-path=/etc/aria2/aria2.conf -D
8. Install ThunderSudo apt-get install lib32ncurses5 lib32z1 #32-bit support package
Landing Thunder download the official website, download the 32-bit package, unzip the winscp into the /usr/local/bin/Xware file
Sudo mkdir /usr/local/bin/Xware #Set up the folder first
Sudo chmod -R 777 /usr/local/bin/Xware #open access
In accordance with the ip address and port, landing winscp, window-style operation, it is convenient, directly dragged into the past on it.
/usr/local/bin/Xware/portal # When the error information feedback is network connection, you can try several times to obtain the activation code, copy it out, use the registration code to log on the website to register http://yuancheng.xunlei.com/login. Html
Directory mapping
Sudo mkdir ~/TDDOWNLOAD -p
Sudo mkdir /data/TDDOWNLOAD -p
Sudo chown greyhanttee ~/TDDOWNLOAD
Sudo chown greyhanttee /data/TDDOWNLOAD
Sudo mount --bind ~/TDDOWNLOAD /data/TDDOWNLOAD # Two downloads do not know who is who, simply use uppercase, consistent with the network side
Sudo vim /etc/rc.local #Starts up, operates with aria2, adds a line of code before "exit 0" in the /etc/rc.local file.
/usr/local/bin/Xware/portal
9. Configure samba Sudo cp /etc/samba/smb.conf /etc/samba/smb.conf.bak #Backup configuration files, if necessary
Sudo vim /etc/samba/smb.conf #Modify configuration files
[displayed file name]
Comment = description word
Path = /data #path
Writable = yes
Public = yes
such as:
[USB Desk]
Comment = the USB desk
Path = /data1
Writable = yes
Public = yes
Sudo smbpasswd -a greyhanttee # Note that before creating a samba user, you must first ensure that there is a Linux user with the same name, otherwise the samba user will fail to create
Sudo service smbd restart
Smbclient -L //localhost/share #test
At this point, the installation is complete, and the next step is to use debugging.
Boot by default into the Ubuntu desktop, select the sound in the system settings, change to available sound output device. Many friends kodi set no sound is set here wrong. And the 5.0.2 that I use also needs the support here to realize the panoramic sound decoding perfectly. If you don't have a picture, you don't want to put a picture. After setting up you can give up using the desktop. Return to the user login screen, click on the dot next to the user name, select kodi, and then directly log in to the kodi interface. Of course, if you uninstall the desktop, you need to go back to the tty interface to set kodi to boot. As for how to use kodi, too many posts on this site are introduced, so I will not go into details.
Install necessary programs #server system is too simple, to support X11 and desktop startup must install the following program
Sudo apt-get install xinit xserver-xorg-video-intel #xinit Network Video Resource Kit
Sudo apt-get install xorg dbus-x11
Sudo apt-get install xserver-xorg-legacy
····
Sudo dpkg-reconfigure xserver-xorg-legacy
Configuration:
Sudo adduser --disabled-password --disabled-login --gecos "" kodi
Sudo usermod -a -G cdrom,audio,video,plugdev,users,dialout,dip,input,tty kodi
Sudo vim /etc/X11/Xwrapper.config # Modify allowed_users=console to allowed_users=anybody and add a line
Needs_root_rights=yes
Sudo vim /etc/init/kodi.conf #Write the following:
# kodi-upstart
# starts Kodi on startup by using xinit.
# by default runs as kodi, to change edit below.
Env USER=kodi
Description "Kodi-barebones-upstart-script"
Author "Matt Filetto"
Start on (filesystem and stopped udevtrigger)
Stop on runlevel [016]
# tell upstart to respawn the process if abnormal exit
Respawn
Script
Exec su -c "xinit /usr/bin/kodi-standalone -- -nocursor :0" $USER
End script
Sudo nano /etc/systemd/system/kodi.service #Configure the startup entry and write the following:
[Unit]
Description = Kodi Media Center
# if you don't need the MySQL DB backend, this should be sufficient
After = systemd-user-sessions.service network.target sound.target
# if you need the MySQL DB backend, use this block instead of the previous
# After = systemd-user-sessions.service network.target sound.target mysql.service
# Wants = mysql.service
[Service]
User = kodi
Group = kodi
Type = simple
#PAMName = login # you might want to try this one, did not work on all systems
ExecStart = /usr/bin/xinit /usr/bin/dbus-launch --exit-with-session /usr/bin/kodi-standalone -- :0 -nolisten tcp vt7
Restart = on-abort
RestartSec = 5
[Install]
WantedBy = multi-user.target
Sudo systemctl daemon-reload #Enable background running service
Sudo systemctl disable lightdm #Disable service, spare
Sudo systemctl enable kodi # This completes the configuration
The installation of these three downloading software is mainly for the convenience of web-side operations, and it is not necessary to download using the download interface.
Login http://192.168.1.199:9091/transmission/web/ (ip for HTPC) can use transmission.
Log in to http://ziahamza.github.io/webui-aria2/ and change the IP address and port number in the configuration to use aria2. I have to say that aria2 is really powerful, and with a lot of plugins you can achieve a very powerful download function.
Thunder will not say more, mainly used in external network landing, or I do not use it.
The use of the NAS function is not strong. The main reason is that it cannot interconnect with the mobile phone. For example, if a photo is taken on a mobile phone or a pad, how to automatically upload it to HTPC, please give me a pointer. The application of domestic network disk in Ubuntu is generally not good, there is no good Dropbox or onedrive, Google Drive, etc. applications can be recommended. To achieve a stronger NAS function is the next lesson to be done.
Shenzhen ChengRong Technology Co.,Ltd. , https://www.chengrongtech.com